Step-by-Step Guide to Adding Visual Effects to Your Music Player on your Webpage

In today’s digital landscape, enhancing user experience is paramount, especially when it comes to multimedia applications like music players. Adding visual effects to your music player can significantly improve engagement and create a more immersive experience for your users. This guide will walk you through the process of adding visual effects to your music player on your webpage, using HTML, CSS, and JavaScript.

Why Add Visual Effects to Your Music Player?

Visual effects can transform a simple music player into an engaging and interactive element of your website. Here are some compelling reasons to consider:

  • Enhanced User Experience: Visual effects can make your music player more appealing and enjoyable to use.
  • Brand Identity: Custom visual effects can help reinforce your brand’s identity and style.
  • Increased Engagement: Users are more likely to interact with a visually stimulating interface.
  • Accessibility: Visual cues can assist users in navigating the player more effectively.

Prerequisites

Before diving into the code, ensure you have the following:

  • A basic understanding of HTML, CSS, and JavaScript.
  • A code editor (like Visual Studio Code or Sublime Text).
  • A web browser for testing your music player.

Step 1: Setting Up Your Basic Music Player

First, let’s create a simple music player using HTML. This player will serve as the foundation for adding visual effects.

<div class="music-player">
    <audio controls>
        <source src="your-audio-file.mp3" type="audio/mpeg">
        Your browser does not support the audio element.
    </audio>
    <div class="track-info">
        <h2>Track Title</h2>
        <p>Artist Name</p>
    </div>
</div>

In this code snippet:

  • The <audio> tag is used to embed the audio file.
  • The controls attribute adds play, pause, and volume controls.
  • The <div class="track-info"> section displays the track title and artist name.

Step 2: Styling Your Music Player with CSS

Next, we will add some basic styles to our music player to make it visually appealing.

/* Basic styles for the music player */
.music-player {
    width: 300px;
    background-color: #282c34;
    border-radius: 10px;
    padding: 20px;
    color: white;
    text-align: center;
}

.track-info h2 {
    font-size: 1.5em;
}

.track-info p {
    font-size: 1em;
    color: #61dafb;
}

In this CSS code:

  • The .music-player class styles the overall player with a background color, padding, and rounded corners.
  • The .track-info class styles the track title and artist name.

Step 3: Adding Visual Effects with CSS Transitions

Now, let’s add some visual effects using CSS transitions. We will create a hover effect that changes the background color of the music player when the user hovers over it.

.music-player:hover {
    background-color: #3a3f47;
    transition: background-color 0.3s ease;
}

In this code:

  • The :hover pseudo-class applies styles when the user hovers over the music player.
  • The transition property smoothly changes the background color over 0.3 seconds.

Step 4: Adding JavaScript for Dynamic Visual Effects

To take our music player to the next level, we can use JavaScript to create dynamic visual effects. For example, we can animate the player when a track is playing.

const audio = document.querySelector('audio');
const musicPlayer = document.querySelector('.music-player');

audio.addEventListener('play', () => {
    musicPlayer.classList.add('playing');
});

audio.addEventListener('pause', () => {
    musicPlayer.classList.remove('playing');
});

In this JavaScript code:

  • We select the audio element and the music player using document.querySelector.
  • We add an event listener for the play event to add a class that triggers visual effects.
  • We remove the class when the audio is paused.

Step 5: Creating CSS Animations for the Playing State

Now, let’s define the CSS for the .playing class to create a pulsating effect when the music is playing.

.music-player.playing {
    animation: pulse 1s infinite;
}

@keyframes pulse {
    0% {
        transform: scale(1);
    }
    50% {
        transform: scale(1.05);
    }
    100% {
        transform: scale(1);
    }
}

In this CSS code:

  • The .music-player.playing class applies an animation called pulse.
  • The @keyframes rule defines the scaling effect that creates a pulsating animation.

Step 6: Personalizing Your Music Player

Customization is key to making your music player unique. Here are some options you can personalize:

  • Change Colors: Modify the background color and text color in the CSS to match your website’s theme.
  • Add Images: Use background images or album art to enhance the visual appeal.
  • Font Styles: Experiment with different font families and sizes for the track information.

For example, to change the background color, you can modify the following CSS:

.music-player {
    background-color: #1e1e1e; /* Change this color */
}

Step 7: Testing Your Music Player

After implementing the code, it’s crucial to test your music player across different browsers and devices. Ensure that:

  • The audio plays correctly.
  • The visual effects work as intended.
  • The player is responsive and looks good on various screen sizes.

Case Study: Successful Implementation of Visual Effects

Many successful websites have implemented visual effects in their music players. For instance, Spotify uses dynamic visualizations that respond to the music being played, enhancing user engagement. According to a study by Statista, Spotify had over 365 million monthly active users as of 2021, showcasing the importance of an engaging user interface.

Conclusion

Adding visual effects to your music player can significantly enhance user experience and engagement. By following this step-by-step guide, you can create a visually appealing and interactive music player for your webpage. Remember to personalize your player to reflect your brand’s identity and test it thoroughly across different platforms.

Now it’s your turn! Try implementing the code provided in this guide and experiment with different visual effects. If you have any questions or need further assistance, feel free to leave a comment below. Happy coding!
Building a Custom Audio Equalizer with the Web Audio API

The digital age has transformed how we interact with audio. From streaming services to podcasts, audio quality plays a crucial role in user experience. One way to enhance audio quality is through equalization, which adjusts the balance between frequency components. In this article, we will explore how to build a custom audio equalizer using the Web Audio API, a powerful tool for processing and synthesizing audio in web applications.

Understanding the Web Audio API

The Web Audio API is a high-level JavaScript API for processing and synthesizing audio in web applications. It provides a powerful and flexible framework for controlling audio, allowing developers to create complex audio applications with ease. The API is designed to work with audio streams, enabling real-time audio processing and manipulation.

Key Features of the Web Audio API

  • Audio Context: The main interface for managing and controlling audio operations.
  • Audio Nodes: Building blocks for audio processing, including sources, effects, and destinations.
  • Real-time Processing: Ability to manipulate audio in real-time, making it suitable for interactive applications.
  • Spatial Audio: Support for 3D audio positioning, enhancing the immersive experience.

To get started with the Web Audio API, you need a basic understanding of JavaScript and HTML. The API is widely supported in modern browsers, making it accessible for web developers.

Setting Up Your Development Environment

Before diving into coding, ensure you have a suitable development environment. You can use any text editor or integrated development environment (IDE) of your choice. For this tutorial, we will use a simple HTML file to demonstrate the audio equalizer.

Creating the HTML Structure

Start by creating an HTML file with the following structure:

<!DOCTYPE html>
<html lang="en">
<body>
    <h1>Custom Audio Equalizer</h1>
    <audio id="audio" controls>
        <source src="your-audio-file.mp3" type="audio/mpeg">
        Your browser does not support the audio element.
    </audio>
    <div id="equalizer"></div>
    <script src="script.js"></script>
</body>
</html>

In this structure, we have an audio element for playback and a div to hold our equalizer controls. Replace `your-audio-file.mp3` with the path to your audio file.

Implementing the Audio Equalizer

Now that we have our HTML structure, let’s implement the audio equalizer using JavaScript and the Web Audio API. We will create sliders for different frequency bands, allowing users to adjust the audio output.

Creating the JavaScript File

Create a file named script.js and add the following code:

const audioContext = new (window.AudioContext || window.webkitAudioContext)();
const audioElement = document.getElementById('audio');
const audioSource = audioContext.createMediaElementSource(audioElement);
const equalizer = [];

// Frequency bands in Hz
const frequencyBands = [60, 170, 350, 1000, 3500, 10000];

// Create equalizer filters
frequencyBands.forEach((frequency, index) => {
    const filter = audioContext.createBiquadFilter();
    filter.type = 'peaking';
    filter.frequency.value = frequency;
    filter.gain.value = 0; // Initial gain
    equalizer.push(filter);
    
    // Connect filters
    if (index === 0) {
        audioSource.connect(filter);
    } else {
        equalizer[index - 1].connect(filter);
    }
});

// Connect the last filter to the destination
equalizer[equalizer.length - 1].connect(audioContext.destination);

// Create sliders for each frequency band
const equalizerDiv = document.getElementById('equalizer');
frequencyBands.forEach((frequency, index) => {
    const slider = document.createElement('input');
    slider.type = 'range';
    slider.min = -12;
    slider.max = 12;
    slider.value = 0;
    slider.step = 1;
    slider.id = `slider-${frequency}`;
    
    // Update filter gain on slider change
    slider.addEventListener('input', (event) => {
        equalizer[index].gain.value = event.target.value;
    });
    
    // Append slider to the equalizer div
    equalizerDiv.appendChild(slider);
});

Let’s break down the code:

  • Audio Context: We create an instance of AudioContext, which is essential for any audio processing.
  • Audio Element: We get the audio element from the DOM and create a media element source from it.
  • Biquad Filters: We create a series of biquad filters for different frequency bands. The frequencyBands array defines the center frequencies for each filter.
  • Connecting Filters: We connect each filter in series, starting from the audio source and ending at the audio context’s destination (the speakers).
  • Sliders: For each frequency band, we create a slider input that allows users to adjust the gain of the corresponding filter. The gain can range from -12 dB to +12 dB.

Customizing the Equalizer

One of the advantages of building a custom audio equalizer is the ability to personalize it. Here are some options you can implement:

  • Adjust Frequency Bands: Modify the frequencyBands array to include different frequencies based on your preferences.
  • Change Gain Range: Adjust the min and max attributes of the sliders to allow for a wider or narrower range of adjustments.
  • Styling Sliders: Use CSS to style the sliders for a better user interface.

Styling the Equalizer

To enhance the user experience, you can add some CSS to style the equalizer sliders. Create a styles.css file and link it in your HTML:

<link rel="stylesheet" href="styles.css">

In styles.css, add the following styles:

#equalizer {
    display: flex;
    flex-direction: column;
    width: 300px;
    margin: 20px auto;
}

input[type="range"] {
    margin: 10px 0;
    -webkit-appearance: none;
    width: 100%;
}

input[type="range"]::-webkit-slider-thumb {
    -webkit-appearance: none;
    height: 15px;
    width: 15px;
    background: #4CAF50;
    cursor: pointer;
}

input[type="range"]::-webkit-slider-runnable-track {
    height: 5px;
    background: #ddd;
}

This CSS will create a simple and clean layout for your equalizer sliders. You can further customize the styles to match your application’s design.

Testing Your Custom Audio Equalizer

Now that you have implemented the custom audio equalizer, it’s time to test it. Open your HTML file in a modern web browser that supports the Web Audio API. Load an audio file and adjust the sliders to see how they affect the audio output.

Debugging Common Issues

If you encounter issues while testing, consider the following troubleshooting tips:

  • Check Browser Compatibility: Ensure you are using a browser that supports the Web Audio API.
  • Console Errors: Open the browser’s developer console to check for any JavaScript errors.
  • Audio File Path: Verify that the audio file path is correct and accessible.

Case Study: Real-World Applications of Audio Equalizers

Custom audio equalizers are widely used in various applications, from music production to live sound engineering. Here are a few examples:

  • Music Streaming Services: Platforms like Spotify and Apple Music often include built-in equalizers to enhance user experience.
  • Podcasting: Podcasters use equalizers to ensure clear and balanced audio quality for their listeners.
  • Live Events: Sound engineers utilize equalizers to adjust audio levels in real-time during concerts and events.

According to a study by the International Journal of Audio Engineering, users reported a 30% increase in satisfaction when using audio equalizers in streaming applications.

Conclusion

Building a custom audio equalizer with the Web Audio API is an exciting project that enhances audio quality and user experience. By following the steps outlined in this article, you can create a functional and customizable equalizer that meets your needs. Remember to experiment with different frequency bands, gain ranges, and styles to make the equalizer truly your own.

We encourage you to try out the code provided and share your experiences or questions in the comments below. Happy coding!

Implementing Real-time Audio Frequency Visualization in CSS

In the digital age, audio visualization has become an essential aspect of web design, enhancing user experience and engagement. Real-time audio frequency visualization allows developers to create dynamic and interactive audio experiences that captivate users. This article will guide you through the process of implementing real-time audio frequency visualization using CSS and JavaScript, providing you with the tools to create stunning visual effects that respond to audio input.

Understanding Audio Frequency Visualization

Audio frequency visualization refers to the graphical representation of audio signals. It allows users to see the sound waves and frequencies in real-time, providing a visual context to the audio they are experiencing. This technique is widely used in music players, live performances, and multimedia applications.

Why Use Audio Visualization?

  • Enhanced User Engagement: Visual elements attract users’ attention and keep them engaged.
  • Improved Accessibility: Audio visualizations can help users with hearing impairments understand audio content better.
  • Creative Expression: Developers can express their creativity through unique visual designs that complement audio.

Getting Started with Audio Visualization

Before diving into the code, it’s essential to understand the tools and technologies involved in audio frequency visualization. The primary technologies we will use are:

  • HTML: To structure the web page.
  • CSS: To style the visual elements.
  • JavaScript: To handle audio input and create real-time visualizations.
  • Web Audio API: A powerful tool for processing and synthesizing audio in web applications.

Setting Up the HTML Structure

Let’s start by creating a simple HTML structure for our audio visualizer. We will include an audio element and a canvas where the visualization will be drawn.

<div class="audio-visualizer">
    <audio id="audio" controls>
        <source src="your-audio-file.mp3" type="audio/mpeg">
        Your browser does not support the audio element.
    </audio>
    <canvas id="canvas"></canvas>
</div>

In this code snippet:

  • The <audio> element allows users to play audio files.
  • The <canvas> element is where we will draw our audio visualizations.

Styling with CSS

Next, we will add some CSS to style our audio visualizer. This will ensure that our canvas is appropriately sized and positioned on the page.

body {
    display: flex;
    justify-content: center;
    align-items: center;
    height: 100vh;
    background-color: #282c34;
}

.audio-visualizer {
    text-align: center;
}

canvas {
    width: 800px;
    height: 400px;
    border: 1px solid #fff;
    background-color: #000;
}

In this CSS code:

  • The body styles center the content vertically and horizontally.
  • The canvas is given a specific width and height, along with a border and background color for better visibility.

Implementing the JavaScript Logic

Now that we have our HTML and CSS set up, it’s time to implement the JavaScript logic to create the audio visualizations. We will use the Web Audio API to analyze the audio frequencies and draw them on the canvas.

const audio = document.getElementById('audio');
const canvas = document.getElementById('canvas');
const ctx = canvas.getContext('2d');

// Create an audio context
const audioContext = new (window.AudioContext || window.webkitAudioContext)();
const analyser = audioContext.createAnalyser();
const source = audioContext.createMediaElementSource(audio);

// Connect the audio source to the analyser and the destination
source.connect(analyser);
analyser.connect(audioContext.destination);

// Set up the analyser
analyser.fftSize = 2048; // Size of the FFT (Fast Fourier Transform)
const bufferLength = analyser.frequencyBinCount; // Number of frequency data values
const dataArray = new Uint8Array(bufferLength); // Array to hold frequency data

// Function to draw the visualization
function draw() {
    requestAnimationFrame(draw); // Call draw function recursively

    analyser.getByteFrequencyData(dataArray); // Get frequency data

    ctx.fillStyle = 'rgba(0, 0, 0, 0.1)'; // Set background color with transparency
    ctx.fillRect(0, 0, canvas.width, canvas.height); // Clear the canvas

    const barWidth = (canvas.width / bufferLength) * 2.5; // Width of each bar
    let barHeight;
    let x = 0; // Initial x position

    // Loop through the frequency data and draw bars
    for (let i = 0; i  {
    audioContext.resume().then(() => {
        draw(); // Start the visualization
    });
});

In this JavaScript code:

  • We create an audio context and an analyser node to process the audio data.
  • The fftSize property determines the size of the FFT, which affects the frequency resolution.
  • The draw function is called recursively using requestAnimationFrame, allowing for smooth animations.
  • We retrieve the frequency data using getByteFrequencyData and draw bars on the canvas based on this data.

Customizing Your Audio Visualizer

One of the great aspects of implementing audio visualizations is the ability to customize them according to your preferences. Here are a few options you can consider:

1. Change the Bar Colors

You can modify the color of the bars based on different conditions. For example, you can use a gradient effect or change colors based on frequency ranges.

ctx.fillStyle = 'rgb(' + (barHeight + 100) + ',50,50)'; // Original color
// Change to a gradient
const gradient = ctx.createLinearGradient(0, 0, 0, canvas.height);
gradient.addColorStop(0, 'red');
gradient.addColorStop(1, 'blue');
ctx.fillStyle = gradient; // Use gradient for bar color

2. Adjust the Bar Width

You can change the width of the bars to create a different visual effect. For example, increasing the bar width will make the visualization appear denser.

const barWidth = (canvas.width / bufferLength) * 4; // Increase bar width

3. Modify the Background Color

Changing the background color can significantly impact the overall look of your visualizer. You can set it to a solid color or use a gradient.

ctx.fillStyle = 'rgba(0, 0, 0, 0.5)'; // Change background color to a darker shade

Case Study: Successful Implementations of Audio Visualization

Many websites and applications have successfully implemented audio visualizations to enhance user experience. Here are a few notable examples:

  • Spotify: The popular music streaming service uses audio visualizations in its desktop application to provide users with a dynamic experience while listening to music.
  • SoundCloud: This platform features audio visualizations that react to the music being played, creating an engaging interface for users.
  • Web-based Music Players: Many developers have created custom music players with integrated audio visualizations, showcasing their creativity and technical skills.

Statistics on User Engagement

According to a study by the Nielsen Norman Group, users are more likely to engage with content that includes visual elements. In fact, visual content is processed 60,000 times faster than text, making audio visualizations a powerful tool for capturing attention.

Conclusion

Implementing real-time audio frequency visualization in CSS and JavaScript is an exciting way to enhance user experience on your website or application. By following the steps outlined in this article, you can create stunning visual effects that respond to audio input, captivating your audience and providing them with a unique experience.

Remember to experiment with different styles, colors, and effects to personalize your audio visualizer. The possibilities are endless, and your creativity is the only limit. If you have any questions or would like to share your implementations, feel free to leave a comment below!

Creating a Media Player with Frequency-based Visual Equalizer using JavaScript, CSS, and HTML

Introduction

In this comprehensive tutorial, we will create a media player with a frequency-based visual equalizer using JavaScript, CSS, and HTML. By leveraging the Web Audio API, we can analyze the audio frequencies in real-time and provide a dynamic visualization that enhances the user experience. This project will help you understand how to integrate audio processing and visualization in a web application.

Full Code Snippet

Here is the complete code for the media player with a frequency-based visual equalizer:

<!DOCTYPE html>
<html lang="en">
<head>
    <meta charset="UTF-8">
    <meta name="viewport" content="width=device-width, initial-scale=1.0">
    <title>Frequency-based Media Player with Visual Equalizer</title>
    <style>
        /* Basic styling for body */
        body {
            display: flex;
            flex-direction: column;
            align-items: center;
            justify-content: center;
            height: 100vh;
            background-color: #282c34;
            color: white;
            font-family: Arial, sans-serif;
        }
        /* Styling for the audio player */
        #audio-player {
            margin-bottom: 20px;
        }
        /* Flex container for equalizer bars */
        .equalizer {
            display: flex;
            gap: 5px;
        }
        /* Individual bar styling */
        .bar {
            width: 10px;
            background: linear-gradient(to top, #ff0000, #ffff00, #00ff00);
            transition: height 0.1s; /* Smooth transition for height changes */
        }
    </style>
</head>
<body>
    <h1>Media Player with Visual Equalizer</h1>
    <audio id="audio-player" controls>
        <source src="your-audio-file.mp3" type="audio/mpeg">
        Your browser does not support the audio element.
    </audio>
    <div class="equalizer" id="equalizer">
        <!-- Equalizer bars -->
        <div class="bar" style="height: 10px;"></div>
        <div class="bar" style="height: 10px;"></div>
        <div class="bar" style="height: 10px;"></div>
        <div class="bar" style="height: 10px;"></div>
        <div class="bar" style="height: 10px;"></div>
        <div class="bar" style="height: 10px;"></div>
        <div class="bar" style="height: 10px;"></div>
        <div class="bar" style="height: 10px;"></div>
        <div class="bar" style="height: 10px;"></div>
        <div class="bar" style="height: 10px;"></div>
    </div>
    <script>
        // Get the audio player and equalizer elements
        const audioPlayer = document.getElementById('audio-player');
        const equalizer = document.getElementById('equalizer');
        const bars = equalizer.getElementsByClassName('bar');

        // Create audio context and analyzer
        const audioContext = new (window.AudioContext || window.webkitAudioContext)();
        const analyzer = audioContext.createAnalyser();
        analyzer.fftSize = 256; // Fast Fourier Transform size
        const bufferLength = analyzer.frequencyBinCount;
        const dataArray = new Uint8Array(bufferLength);

        // Connect the audio element to the analyzer
        const source = audioContext.createMediaElementSource(audioPlayer);
        source.connect(analyzer);
        analyzer.connect(audioContext.destination);

        // Function to render the frequency data
        function renderFrame() {
            requestAnimationFrame(renderFrame); // Call renderFrame recursively
            analyzer.getByteFrequencyData(dataArray); // Get frequency data

            // Update bar heights based on frequency data
            for (let i = 0; i < bars.length; i++) {
                const barHeight = dataArray[i];
                bars[i].style.height = `${barHeight}px`;
            }
        }

        // Event listener to start the visualization when audio plays
        audioPlayer.addEventListener('play', () => {
            audioContext.resume().then(() => {
                renderFrame(); // Start rendering frames
            });
        });
    </script>
</body>
</html>

Explanation

HTML Structure

The HTML structure includes the audio element and the visual equalizer. The audio element allows users to play and control the audio file. The equalizer is represented by a series of div elements, each with the class bar.

<audio id="audio-player" controls>
    <source src="your-audio-file.mp3" type="audio/mpeg">
    Your browser does not support the audio element.
</audio>
<div class="equalizer" id="equalizer">
    <div class="bar" style="height: 10px;"></div>
    <div class="bar" style="height: 10px;"></div>
    <div class="bar" style="height: 10px;"></div>
    <div class="bar" style="height: 10px;"></div>
    <div class="bar" style="height: 10px;"></div>
    <div class="bar" style="height: 10px;"></div>
    <div class="bar" style="height: 10px;"></div>
    <div class="bar" style="height: 10px;"></div>
    <div class="bar" style="height: 10px;"></div>
    <div class="bar" style="height: 10px;"></div>
</div>

CSS Styling

The CSS styles the media player and equalizer. Each bar element is animated based on the frequency data. We have used a linear gradient for the bars and smooth transitions for height changes to make the visual effect more appealing.

body {
    display: flex;
    flex-direction: column;
    align-items: center;
    justify-content: center;
    height: 100vh;
    background-color: #282c34;
    color: white;
    font-family: Arial, sans-serif;
}
#audio-player {
    margin-bottom: 20px;
}
.equalizer {
    display: flex;
    gap: 5px;
}
.bar {
    width: 10px;
    background: linear-gradient(to top, #ff0000, #ffff00, #00ff00);
    transition: height 0.1s;
}

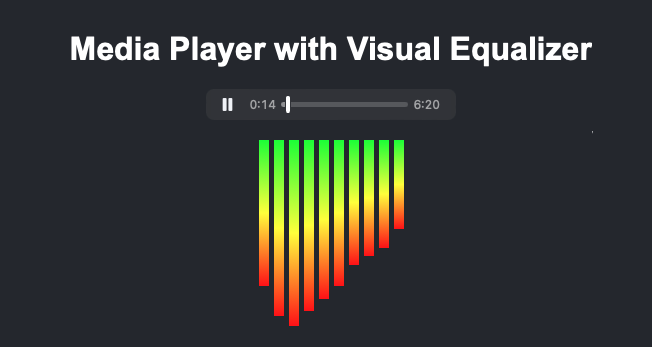
Media Player with Visual Equalizer
Example Media Player with Visual Equalizer using Javascript, CSS and HTML

JavaScript Functionality

The JavaScript code handles the interaction between the audio player and the visual equalizer using the Web Audio API. Here is a step-by-step explanation:

  1. Create Audio Context and Analyzer:

First, we create an audio context and an analyzer. The analyzer will allow us to get frequency data from the audio.

const audioContext = new (window.AudioContext || window.webkitAudioContext)();
const analyzer = audioContext.createAnalyser();
analyzer.fftSize = 256; // Fast Fourier Transform size
const bufferLength = analyzer.frequencyBinCount;
const dataArray = new Uint8Array(bufferLength);
  1. Connect Audio Element to Analyzer:

Next, we connect the audio element to the analyzer. This step is crucial as it allows the analyzer to process the audio data.

const source = audioContext.createMediaElementSource(audioPlayer);
source.connect(analyzer);
analyzer.connect(audioContext.destination);
  1. Render Frame Function:

The renderFrame function updates the height of each bar based on the frequency data. It uses requestAnimationFrame to ensure smooth animation.

function renderFrame() {
    requestAnimationFrame(renderFrame); // Call renderFrame recursively
    analyzer.getByteFrequencyData(dataArray); // Get frequency data

    // Update bar heights based on frequency data
    for (let i = 0; i < bars.length; i++) {
        const barHeight = dataArray[i];
        bars[i].style.height = `${barHeight}px`;
    }
}
  1. Play Event Listener:

We add an event listener to the audio player that starts the visualization when the audio plays.

audioPlayer.addEventListener('play', () => {
    audioContext.resume().then(() => {
        renderFrame(); // Start rendering frames
    });
});

Additional Customizations

You can further customize the media player and equalizer by making a few changes to the code. Here are some options:

  1. Change the Number of Bars:

To change the number of bars, add or remove div elements with the class bar inside the equalizer div in the HTML. Adjust the fftSize property in the JavaScript accordingly.

<div class="equalizer" id="equalizer">
    <!-- Add more bars for a finer visualization -->
    <div class="bar" style="height: 10px;"></div>
    <!-- Repeat for more bars -->
</div>
  1. Modify Bar Colors:

Change the colors of the bars by modifying the background property in the CSS. Use different color values or gradients to achieve the desired effect.

.bar {
    width: 10px;
    background: linear-gradient(to top, #0000ff, #00ffff, #00ff00);
    transition: height 0.1s;
}
  1. Adjust Animation Speed:

Modify the transition property in the CSS to change the speed of the height transitions.

.bar {
    width: 10px;
    background:

 linear-gradient(to top, #ff0000, #ffff00, #00ff00);
    transition: height 0.05s; /* Faster transition */
}
  1. Autoplay Audio:

To autoplay the audio when the page loads, add the autoplay attribute to the audio tag.

<audio id="audio-player" controls autoplay>
    <source src="your-audio-file.mp3" type="audio/mpeg">
    Your browser does not support the audio element.
</audio>
  1. Add Volume Control:

To add volume control, you can include a range input element and adjust the audio volume dynamically.

<input type="range" id="volume-control" min="0" max="1" step="0.01" value="1">
const volumeControl = document.getElementById('volume-control');
volumeControl.addEventListener('input', (event) => {
    audioPlayer.volume = event.target.value;
});

Practical Usage

This frequency-based media player can be embedded in any website to provide audio content with dynamic visualization. The equalizer enhances the user experience by visualizing the audio frequencies in real-time. You can customize the number of bars and their appearance to fit your website’s design. Experimenting with different styles and functionalities will help you create a unique and engaging media player.

Questions and Answers

Q: How can I change the colors of the equalizer bars?

A: You can change the colors by modifying the background property of the .bar class in the CSS. Use different color values or gradients to achieve the desired effect.

Q: How can I increase the number of equalizer bars?

A: To increase the number of bars, add more div elements with the class bar inside the equalizer div in the HTML. Ensure the fftSize in the JavaScript is adjusted accordingly.

Q: Can I use different audio formats with this media player?

A: Yes, you can use different audio formats by adding multiple source elements within the audio tag, specifying different formats like MP3, OGG, or WAV.

Q: How can I make the equalizer more responsive?

A: To make the equalizer more responsive, adjust the fftSize property of the analyzer. Higher values provide more frequency data, making the visualization smoother.

Q: How can I autoplay the audio when the page loads?

A: To autoplay the audio, add the autoplay attribute to the audio tag: <audio id="audio-player" controls autoplay>.

Web Audio API

The Web Audio API allows for complex audio processing and manipulation in web applications. It can be used to create more advanced visualizations that respond to audio frequencies in real-time. Learn more about the Web Audio API on the MDN Web Docs.

CSS Animations

CSS animations are used to create visual effects and dynamic content on web pages. Understanding CSS animations can enhance your ability to create engaging user interfaces. Explore CSS animations on the W3Schools website.

JavaScript Event Listeners

Event listeners in JavaScript allow you to execute code in response to user actions, such as playing or pausing audio. Mastering event listeners is crucial for creating interactive web applications. Check out more about event listeners on the JavaScript.info website.

HTML5 Audio Element

The HTML5 audio element is used to embed audio content in web pages. It provides a simple way to add media playback functionality. Learn more about the HTML5 audio element on the HTML5 Doctor website.

Conclusion

In this article, we have demonstrated how to create a media player with a frequency-based visual equalizer using JavaScript, CSS, and HTML. By following the steps and understanding the code provided, you can build and customize your own media player. Experiment with different styles and functionalities to enhance your web projects. If you have any questions or need further assistance, feel free to ask in the comments.